Adding a Transparent Watermark to Images with OpenCV
Learn how to overlay a transparent watermark onto an image using OpenCV and Python, including masking and region of interest (ROI) techniques.
Overview
Adding a watermark to images is a common task in digital image processing, useful for branding, copyright protection, or simply marking your work. In this tutorial, you'll learn how to overlay a transparent watermark onto another image using OpenCV and Python, with step-by-step explanations and code.
Prerequisites
You'll need the following Python libraries:
- opencv-python: For image processing operations
- matplotlib: For displaying images
- numpy: For numerical operations
Install them with:
pip install opencv-python matplotlib numpy
Basic Setup
Let's start by importing the necessary libraries:
import sys
import numpy as np
np.set_printoptions(threshold=sys.maxsize)
import cv2
from matplotlib import pyplot as plt
Step 1: Reading and Preparing Images
Loading Images
We'll use two images: a main image and a watermark image.
# Read Images in BGR Mode
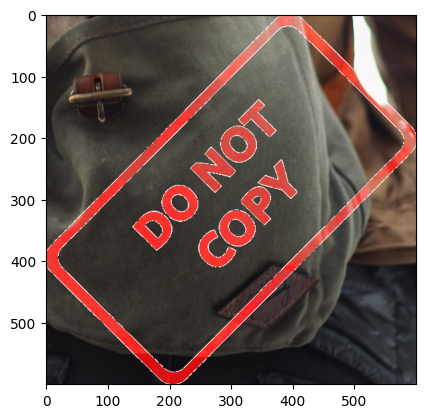
dogImg = cv2.imread('Assets/dog_backpack.jpg')
watermarkImg = cv2.imread('Assets/watermark_no_copy.png')
Converting Color Spaces
OpenCV loads images in BGR format. Convert them to RGB for correct display:
dogImg = cv2.cvtColor(dogImg, cv2.COLOR_BGR2RGB)
watermarkImg = cv2.cvtColor(watermarkImg, cv2.COLOR_BGR2RGB)
Resizing the Watermark
Resize the watermark to fit the target area:
watermarkImg = cv2.resize(watermarkImg, (600, 600))
plt.imshow(watermarkImg)
plt.show()

Step 2: Defining the Region of Interest (ROI)
To overlay the watermark, we need to select a region in the main image where the watermark will be placed.
# Calculate offsets for placement
x_offset = 934 - 600
y_offset = 1401 - 600

# Get watermark dimensions
rows, cols, channels = watermarkImg.shape

# Define ROI in the main image
roi = dogImg[y_offset:1401, x_offset:984]
Step 3: Creating a Mask for the Watermark
Convert Watermark to Grayscale
We'll use a mask to separate the watermark from its background.
watermarkGray = cv2.cvtColor(watermarkImg, cv2.COLOR_RGB2GRAY)
plt.imshow(watermarkGray, cmap='gray')
plt.show()

Create the Mask
Remove the white background of the watermark image, bitwise_not: meaning it converts all 0s to 1s and all 1s to 0s.
Invert the grayscale watermark to create a mask:
mask = cv2.bitwise_not(watermarkGray)
plt.imshow(mask, cmap='gray')
plt.show()

Step 4: Preparing Background and Foreground
Create a White Background
whiteBackground = np.full(watermarkImg.shape, 255, dtype=np.uint8)
Apply the Mask
Use bitwise operations to isolate the watermark and its background:
# White background with mask
bk = cv2.bitwise_or(whiteBackground, whiteBackground, mask=mask)
plt.imshow(bk)
plt.show()

# Watermark foreground with mask
fg = cv2.bitwise_or(watermarkImg, watermarkImg, mask=mask)
plt.imshow(fg)
plt.show()

Step 5: Combining the Watermark with the ROI
Overlay the watermark onto the selected region:
final_roi = cv2.bitwise_or(roi, fg)
plt.imshow(final_roi)
plt.show()
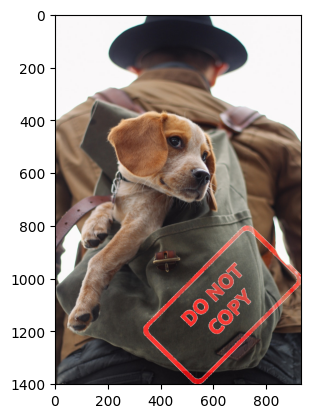
Step 6: Placing the Watermarked ROI Back
Paste the watermarked region back into the original image:
large_img = dogImg
small_img = final_roi

large_img[y_offset:y_offset+small_img.shape[0], x_offset:x_offset+small_img.shape[1]] = small_img

plt.imshow(large_img)
plt.show()
Understanding the Process
- ROI (Region of Interest): The area in the main image where the watermark will be placed.
- Masking: Used to separate the watermark from its background, allowing for transparent overlays.
- Bitwise Operations: Essential for combining images and masks in OpenCV.