Image Blending and Overlay Techniques with OpenCV
Learn how to blend images using weighted addition and overlay images with precise positioning using OpenCV and Python
Overview
Image blending and overlay are fundamental techniques in computer vision and image processing. They allow you to combine multiple images in various ways, from simple blending to precise overlay positioning.
Prerequisites
To follow along with this tutorial, you'll need to install these Python libraries:
- opencv-python: For image processing and blending operations
- matplotlib: For displaying images
- numpy: For numerical operations
You can install them using:
pip install opencv-python matplotlib numpy
Basic Setup
Let's start by importing the necessary libraries:
import cv2
import numpy as np
from matplotlib import pyplot as plt
Step 1: Reading and Preparing Images
Loading Images
First, we'll read two different images that we want to blend:
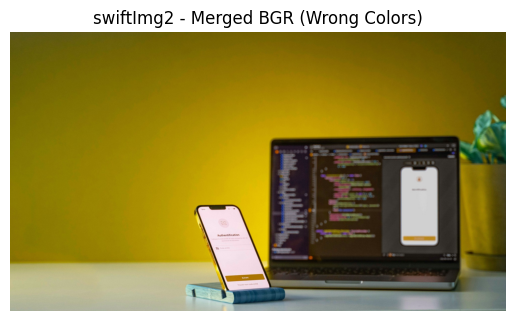
# Read the image in BGR Mode
swiftImg = cv2.imread('Assets/adv.jpeg')
shutterImg = cv2.imread('Assets/shutter.webp')
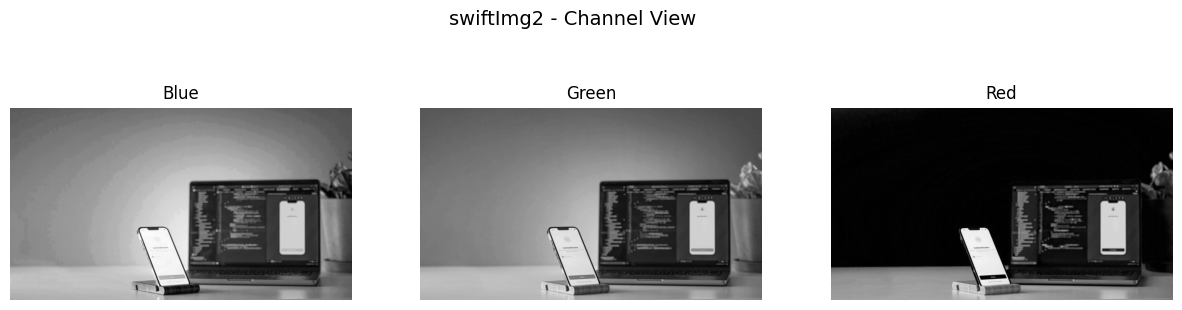
Converting Color Spaces
OpenCV reads images in BGR format, so we need to convert them to RGB for proper display:
# Convert the image from BGR to RGB
swiftImg = cv2.cvtColor(swiftImg, cv2.COLOR_BGR2RGB)
shutterImg = cv2.cvtColor(shutterImg, cv2.COLOR_BGR2RGB)


Step 2: Image Resizing
Before blending, we need to ensure both images have the same dimensions:
# Resize the images
swiftImg = cv2.resize(swiftImg, (600, 600))
shutterImg = cv2.resize(shutterImg, (600, 600))
Step 3: Weighted Image Blending
Understanding cv2.addWeighted()
The cv2.addWeighted() function blends two images together by calculating a weighted sum of their pixel values. This is useful for creating smooth transitions or overlays between images.
# Blending the images, alpha = 0.5, beta = 0.5, gamma = 0
blendedImg = cv2.addWeighted(src1=swiftImg, alpha=0.5, src2=shutterImg, beta=0.5, gamma=0)
Parameters explained:
src1: First source imagealpha: Weight of the first image (0.0 to 1.0)src2: Second source imagebeta: Weight of the second image (0.0 to 1.0)gamma: Scalar added to the weighted sum
Displaying the Blended Image
# Display the blended image
plt.imshow(blendedImg)
plt.show()

Step 4: Image Overlay with Positioning
Reading Images for Overlay
# Read Images in RGB Mode
swiftImg2 = cv2.imread('Assets/adv.jpeg')
shutterImg2 = cv2.imread('Assets/shutter.webp')

swiftImg2 = cv2.cvtColor(swiftImg2, cv2.COLOR_BGR2RGB)
shutterImg2 = cv2.cvtColor(shutterImg2, cv2.COLOR_BGR2RGB)
Resizing for Overlay
We resize the smaller image to fit within the larger one:
# Resize the images
shutterImg2 = cv2.resize(shutterImg2, (300, 300))
Setting Overlay Position
# Set the small images' starting position that will be placed on the larger image
xOffset = 0
yOffset = 0

# Set the small images' ending position that will be placed on the larger image
xEnd = xOffset + shutterImg2.shape[1]
yEnd = yOffset + shutterImg2.shape[0]
Performing the Overlay
# Place the small image on the larger image
swiftImg2[yOffset:yEnd, xOffset:xEnd] = shutterImg2

# Display the image
plt.imshow(swiftImg2)
plt.show()
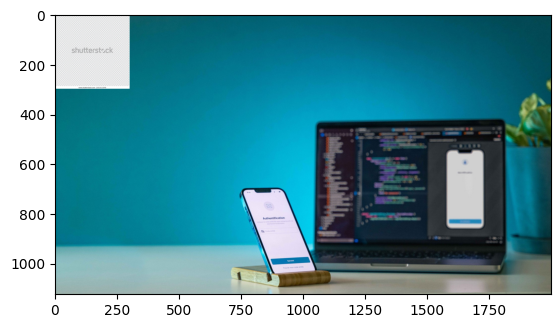
Understanding Image Overlay
Coordinate System
xOffset, yOffset: Starting position (top-left corner)xEnd, yEnd: Ending position (bottom-right corner)shape[1]: Width of the imageshape[0]: Height of the image