How to Downgrade Jetpack Version on NVIDIA Jetson: A Complete Guide for Xavier NX 16GB
A concise guide to safely downgrading Jetpack OS on NVIDIA Jetson Xavier NX 16GB.
Introduction
Downgrading Jetpack versions on NVIDIA Jetson devices can be a challenging task, especially when dealing with devices that have both eMMC and NVMe storage. This guide focuses on the Xavier NX 16GB Development Kit with:
- 16GB eMMC (internal storage)
- 128GB NVMe (external storage)
Whether you need to downgrade for compatibility reasons (like matching a ZED camera's required OS version) or other project requirements, this guide will walk you through the most reliable method.
What NOT to Do (Learn from My Mistakes 😅)
Before we dive into the correct approach, let me save you some time (and potential headaches) by sharing what definitely doesn't work. Trust me, I've been there!
The 16GB Partition Trap
Here's the thing: NVIDIA SDK Manager has a quirk where it creates a 16GB APP partition by default (you can see this in the flash.xml kernel files). This happens whether you install on eMMC or NVMe, and it doesn't matter if you have a 128GB NVMe drive sitting there looking all spacious and ready. The SDK Manager will still create that pesky 16GB partition, leaving you with no space to install Target Component SDKs.
The Manual Kernel Editing Adventure (Spoiler: It Doesn't End Well)
So naturally, I thought: "Hey, I'm smart! I'll just manually edit the kernel and resize that partition!" 🤓
I tried running commands like this:
sudo ./tools/kernel_flash/l4t_initrd_flash.sh \
  --external-device nvme0n1p1 \
  -c tools/kernel_flash/flash_l4t_external.xml \
  -S 110GiB \
  --showlogs \
  --network usb0 \
  jetson-xavier-nx-devkit-emmc external
Or manually editing and trying to flash by NVIDIA SDK Manager’s flash.xml file by changing the APP partition block, like:
<partition name="APP" type="data">
    <allocation_policy>sequential</allocation_policy>
    <filesystem_type>basic</filesystem_type>
    <size>15032385536</size>
    ...
</partition>
—does NOT solve the partition size issue for Jetson devices that combine eMMC and NVMe, since the limitation is enforced elsewhere in the flashing workflow.
Result? Epic failure. I searched forums, tried custom terminal commands, edited kernel files manually... and still couldn't get it to work. Maybe I missed some details, but honestly, it's just not worth the trouble.
The Dual-Boot Disaster
Then I had another "brilliant" idea: "What if I install the OS on both eMMC and NVMe, boot from eMMC, and then try to expand the NVMe partition?"
Spoiler alert: This led to:
- Unmount errors (the system got confused about which partition to use)
- Damaged partition structure (my NVMe was not happy)
- Boot failures (the device refused to boot at all)
It was like trying to juggle chainsaws while riding a unicycle. Technically possible? Maybe. A good idea? Absolutely not.
The Bottom Line
The main issue is simple: you can't install NVIDIA SDK Manager Target Components because there's no space (thanks to that 16GB partition limit). It doesn't matter if you have 16GB eMMC or 128GB NVMe - the SDK Manager treats them the same way.
So save yourself the frustration and follow the method in this guide instead. Your future self (and your Jetson device) will thank you! 🙏
Prerequisites
Before starting, ensure you have the following:
1. Host Computer
You'll need a separate computer (host computer) that will help you flash the OS and target components to your Jetson device via USB cable.
Recommended Ubuntu versions:
- Ubuntu 18.04 for Jetpack 4.x versions
- Ubuntu 20.04 for Jetpack 5.x versions
- Ubuntu 22.04 for Jetpack 6.x versions
Note: Using the recommended Ubuntu version for your target Jetpack version helps avoid compatibility issues during the flashing process.
2. Recovery Mode Jumper Cap
You'll need a jumper cap to connect the FC REC (Force Recovery) and GND (Ground) pins and force your device into recovery mode.
 Photo by 0831ww59 from NVIDIA Developer forum. If you have a different Jetson model, please refer to its datasheet for instructions on forcing recovery mode.
3. NVIDIA SDK Manager
Download and install the NVIDIA SDK Manager on your host computer. This tool will handle the flashing process.
Step-by-Step Downgrade Process
Step 1: View Available Jetpack Versions
Because you may not see the older Jetpack version you want to downgrade to in the default SDK Manager interface,
 Screenshot of NVIDIA SDK Manager showing archived versions selection.
you should check which archived versions are available. To do this, open a terminal on your host computer and run:
sdkmanager --archivedversions
After opening the NVIDIA SDK Manager app, you'll be able to see the available Jetpack versions listed in the interface.
Step 2: Prepare Your Jetson Device
- Power off your Xavier NX device completely
- Place the jumper cap on the recovery mode pins (if you have one)
- Connect the USB cable from your host computer to the Jetson device
The device should now be in recovery mode and ready to be detected by your host computer.
Step 3: Launch SDK Manager
- Open NVIDIA SDK Manager on your host computer
- Log in with your NVIDIA Developer account credentials
- In the Product Selection screen, you should see your Jetson device detected
Step 4: Configure Installation Options
- Select your target device: Xavier NX 16GB Development Kit
- Choose installation target:
- For NVMe installation: Select NVMe as the target storage
- The SDK Manager will flash both the OS and target components to your NVMe drive
Important: The SDK Manager creates a 16GB
APPpartition by default (visible inflash.xmlkernel files). This is a known limitation that affects both eMMC and NVMe installations, regardless of your storage capacity.
Step 5: Flash the OS
- Click Continue to start the flashing process
- The SDK Manager will:
- Download the required Jetpack components
- Flash the Linux OS to your selected storage (NVMe in this case)
- Wait for the system login screen to appear
Step 6: Complete Target Component Installation
- Once the OS is flashed and the login screen appears, connect to the device via the SDK Manager
- Enter your username and password when prompted
- The SDK Manager will continue installing the target components
Common Issue: You may encounter a "no disk space" error during target component installation. This is because the SDK Manager creates a 16GB
APPpartition regardless of your actual storage capacity.
Solution: Use the rootOnNVMe method
NVIDIA provides a rootOnNVMe solution that may help with partition management. You can find more information in the NVIDIA documentation.
Storage Expansion Steps (Root on NVMe SSD)
If you need to expand your storage and move your root filesystem from the onboard eMMC to the SSD (NVMe), follow these steps. This will give you much more space for installing applications, SDK components, and storing data.
Step 1: Install the SSD
First, physically install the NVMe SSD into your Jetson Xavier NX device. Refer to the official Hardware Instructions or your device documentation for the installation procedure.
Step 2: Prepare the SSD
- Open the Disks tool:
PressCtrl+For click the Ubuntu icon in the upper left corner and search for “Disks”. Open the Disks utility. - Select your SSD:
In the left panel, select your new SSD. - Format the SSD:
Click the “Format Disk” option (upper right, under the menu bar).- Choose GPT as the partitioning scheme.
- Confirm when prompted and enter your password if needed.
- Create Partition:
Click the+button in the middle bar to add a new partition.- Name your SSD partition.
- Select Ext4 as the filesystem type.
- Click “Create”.
Your SSD is now ready for use.
Step 3: Copy Root Filesystem to SSD
We’ll use the official rootOnNVMe script to migrate the root filesystem.
- Open a terminal and clone the script repository:
git clone https://github.com/limengdu/rootOnNVMe.git cd rootOnNVMe/ - Run the copy script to transfer the entire root filesystem from eMMC to SSD:
./copy-rootfs-ssd.shNote: The process duration depends on your root directory size. Wait for the script to complete!
Step 4: Configure Environment and Complete Expansion
- Run the setup script to configure the bootloader and environment:
./setup-service.sh - After setup, reboot your Jetson device.
When the system restarts, your eMMC will appear as an external storage device, and the main system will boot from the SSD. You should see much more available disk space—expansion complete!
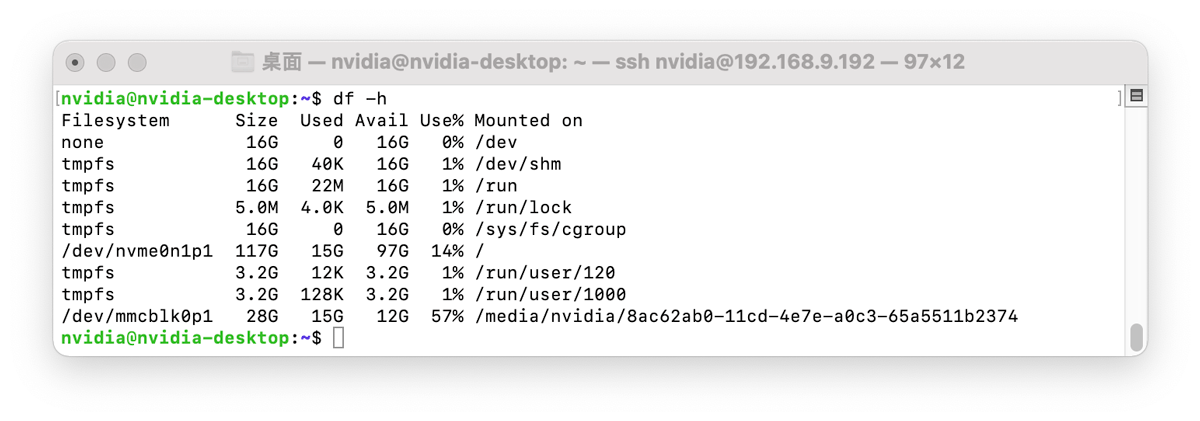
Image taken from NVIDIA Documentation above.
Note: Now you can use NVIDIA SDK Manager to install additional components (such as CUDA, DeepStream, etc.) without limiting yourself with specified APP partition size.
When running SDK Manager, simply deselect the "OS" option during the installation process, so it only installs the target components to your expanded NVMe. This way, your custom root and all your saved data on the SSD remain intact.